Sunday, June 10, 2012
Thursday, February 4, 2010
If I could.....
Get high yet not have a hangover
Eat all that I like yet not feel full
Drive at breakneck speeds without the fear of breaking necks
Learn from experience yet not get old
Get pure water without paying for it
Speak my heart and yet not be termed "politically incorrect"
Eat all that I like yet not feel full
Drive at breakneck speeds without the fear of breaking necks
Learn from experience yet not get old
Get pure water without paying for it
Speak my heart and yet not be termed "politically incorrect"
Thursday, January 28, 2010
Flickr, comments, Explore, photos, aspiring photographers and crappy photos!
Having been a hyper active Flickrite for over 3 years I was trying hard not to write this post but it was compelling as I had to say this to those 10% (or less) of serious guys out there who want to "REALLY" improve their photography rather than garner "nice comments"
When I started off on Flickr I used to take terrible shots (and I had been shooting for 17 years). You can see for yourself http://www.flickr.com/photos/pvs2007/ if you go to the last few pages and in those days you never got 100 comments and 200 faves. There were a couple of people who might still like your photo but the key was to look for "good" photographers and "virtual groups" where you could see some classy shots and invite criticism so that you can change your perspective to take better shots. One such group is "Make it a Mega Shot" which is run by Cyrus Khamak and a few Flickr contacts. My photography improved leaps and bounds in a matter of a few months and so has the clicking ability of a lot of people I know. The reason was simple, we were not in a race to garner "nice" comments
About comments and criticism: Yes, everyone likes a "nice" comment, including me and I would be lying if I said I don't look at that column everyday against a photo I uploaded BUT that is not the be all and end all (if you consider yourself in the 10% or less, of course).
If you ask for criticism on Flickr you do get it and get it real bad. That's because you are BAD, accept it and life will be much better. There will be photos you think are amazing and will be the flavor of the day on Flickr and suddenly one guy will come and tear it apart, it has happened and rather than having a sullen face just get on with the next shot.
NEVER BE DEFENSIVE else people will stop critiquing your photos, unless that's what you want. There is nothing called "constructive criticism, mild criticism etc etc". Criticism is criticism, period. You have the heart to take it then you might improve, else languish in your current state forever
The "Explore" rush: Yes, getting your photo on to explore is a definite thrill. Flickr says it is among 500 photos of a particular day and it is also ranked and the top few photos appear on the 1st page for a few minutes. Great, but what does it mean to you? You do surely get more people to see your photo, which is awesome BUT it surely does not necessarily mean that your photo is classy. A lot of crappy photos get into Explore too. An algorithm decides which photo goes into Explore and it heavily depends on the number of comments, faves, views you get within a short time from the time of posting the picture. A lot of "I scratch your back and you scratch mine" goes on in this race. People leave "nice comments" on any and every photo just so that those guys do the same on theirs and suddenly you have an "Explore" photo. But one simple question at the end: what has this done to improving the way you click???
I am not against getting photos on Explore or enjoying the time it gets there but again apart from giving you that viewership it really does not add any value to your photo taking abilities in anyway. And it is not a tale of sour grapes, I have had 67 of my photos on Explore at some point, even now I think 3 are there
The worst thing to do: Do NOT ask for critiques if you don't have the appetite for them. If you want "nice" comments from people who do not understand photography go ahead and enjoy but don't do it under the garb on someone who is out there to become a "serious" photographer and "learn" from fellow Flickrites, you will be disrobed very soon as it will be come apparent over a period of time that you don't like people not liking your photo and the fact will be visible to everyone that you aren't improving either!
I know this sounds like a very negative post but I had to write for the 10% or less, as I mentioned earlier-they probably will realize the value of this
Tuesday, January 12, 2010
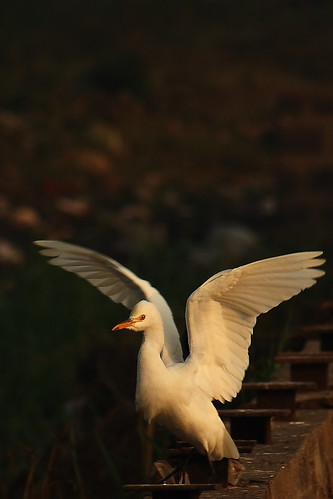
Shooting Birds

What do I need?
1) Lots of money: I am not kidding. If you want to do serious bird photography you need at least a 400mm lens with a minimum aperture of not more than f5.6. Sigma and Tamron make cheaper lenses but cannot compete in terms of quality with Canon and Nikon. The Canons and Nikons cost Rs 70000 plus. You can use the 400mm plus a 1.4x extender which will make it around 560mm but you will lose speed-the aperture will become f8 and autofocus in most cameras won't work (which is a must for shots of birds in flight)
If you have lots of money get the 500mm or 600mm. These are tack sharp but you have to use them with a tripod. Hand held is almost impossible as they are more than 5 kg in weight. Did I mention that these lenses will cost you upward of 2-3 lakhs?
2) A GOOD tripod: When I say good I mean a carbon fibre tripod (light but very sturdy) with a Ball head so that you can manouvre your lens in any way quickly. I am not talking about tripods which have three different screws for moving the camera horizontally, vertically and adjust height. Again these will set you back by about Rs 20-40 thousand
3) Lens with IS: Only if you are going to shoot hand held (which is not a great idea anyway) and useless if you are buying 500mm or more
4) Camera: Make sure your camera has at least 7-9 focusing points or more. this is necessary when you want to take shots of birds in flight. Cameras also have a movement tracking focus system but I have not had a great experience with these. Also make sure the camera has burst mode and at least 4fps or more
5) Excellent command over camera modes and functions: On the field you will be required to make changes quickly and probably for every 2-3 shots. If you take your own time the bird ain't waiting...
6) Loads of Patience: You will get terrible shots most of the time as your camera might not have focused right, the bird might have moved and created blur, you miss the moment, exposure not correct, camera shake, the list is endless. So be prepared to spend hours of looking through the viewfinder and click at the right moment. You will love the shots you get
Method that works for me:
1) Wait and watch: Move very little and try to be in one position for longer times so that the birds are not disturbed and take you for granted. If you have to move do it very slowly and without making noise
2) Aperture priority mode: I set the minimum aperture of the lens so that I get maximum speed. I generally do not hike up ISO more than 300 as grainy bird shots are terrible
3) Overexpose: I generally overexpose by 1/2 or 1 stop so that if I am shooting against the light the bird does not get underexposed
4) Go to the place again and again: This tells you about the habits of the birds, their time schedule and the best vantage points
5) DO NOT pelt stones to make birds fly or feed or disturb them in any way... Please!!!
Wednesday, January 6, 2010
Why do I get lifeless landscapes?
What do I mean by lifeless?
Washed out Skies: The camera is a machine following rules. The exposure meter cannot get everything right. Nowadays meters are pretty advanced but yet they do get fooled. Basically what happens is that when more of your frame contains land the camera gives you exposure reading for exposing the land correctly but the sky is brighter than the land so the details of the sky are lost. The reverse happens when your frame contains more of the sky. The meter exposes the sky correctly and darkens the land. How to solve this dilemma? First understand how the meter works. Read "Ansel Adams" "Zone System", (see the last 2 links in this article) written decades ago but still serving as an anthem to photographers who want to get perfect exposures. You can use a neutral graduated filter to cut off excess light in the sky or use HDR. You could also shoot at times of the day when the light ratio between land and sky is not too high, dawn and dusk
Colorless: The best natural lighting during the day is at dawn and dusk and remains only for a few minutes. The color of the landscape is vivid during this time and very soothing. As the sun goes higher the contrast (read dynamic range) in the scene increases which also has a negative impact on color. Man made objects can still look colorful at different times of the day provided you select a good angle to shoot them from. Sometimes it is better to shoot in the shade than in direct sunlight. Use of a polarizing filter also helps in getting better colors. Clouds can have a funny effect on color. White clouds on blue skies render great landscape shots but gray dark clouds take color away and make almost everything appear gray. Long exposures and a little bit of PS can actually give you fantastic shots during such conditions
Composition and Framing: Although you can make the camera capture the scene your eyes see and tell you "this is a great scene", remember that the eye has almost a 180 degree view and almost infinite "dynamic range", a fantastic self adjusting aperture giving magical DOF and it is dynamic, i.e. it does not capture a moment but actually captures a series of moments and your brain interprets these.The camera has no brain to interpret thus it is left to the person viewing the picture to interpret it. Composition is the "art" in photography. Don't just snapshoot a landscape:
Have some interest in the foreground: This gives the picture depth. In other words it gives a feeling of the distance between where you are and where your subject is or where your subject is and the background
Framing: Have some element provide a natural frame to the picture, like tree branches or an arch of a gateway etc. this holds the attention of the viewer within the frame
Balance: Have elements arranged in the frame so that one part is not too heavy and the other barren
These are just some tips, you can read about composition in detail here:
Tuesday, January 5, 2010
Stop "convenience shooting"
This is again for people out there who aspire to be serious photographers, "not for snap shooters"
What is "convenience shooting"?
You have a camera and you take the camera with you as an afterthought. You have not read and understood the camera manual completely and you don't intend to either. You don't have a plan on what you want to shoot/any specific subject in mind and keep clicking whatever you think "appeals" to your eye. Then you get home and get lost in your daily chores and one day you remember you have some pictures to download. After downloading you over process some "ok" shots and try to make them look good using Photoshop and then upload all over the net for "comments" from others
If you want to become a serious photographer here is what you might want to do differently:
1. Plan the Shoot: It helps if you have visited the place before or at least seen pictures and read about it over the net. Ask yourself: Will I be shooting more landscapes, people, markets, portraits, group shots, wildlife? Depending on the subject, attach the ideal lens on your camera. Pre set whatever settings on your camera can be pre set so that you waste less time in tuning your camera
2. Good Old Patience: This is the key. Wait for the right moment, right lighting, right focus, right framing. A great shot is seldom accidental. Landscapes and Macros require maximum patience.
3. Pre-visualization: This comes from the master himself "Ansel Adams". Pre-visualization is imagining how the output of your shoot will be and making sure you have the inputs well controlled to give you the ideal output. For example, if you pre visualize your portrait to have very blurred background, the key input you have to control is the aperture (as wide as possible). Make sure you pre-visualize every shot. You may not get the desired output every time but at least you will investigate why and this will make you realize your follies and make you a better photographer
4. Enjoy loneliness: The best shots you get are when there is no one nagging you to move on and talking to you constantly about worldly affairs. Either go for the shoot alone or with like minded people. Here is what I did-I encouraged my wife to embrace photography and gave her my 300D and we share lenses, thus she is as engrossed as I am in shooting when we are together on a shoot
I am not suggesting you don't take your camera everywhere or stop shooting random shots but don't make that your mainstay. What camera you own is not of great consequence as long as you are on the learning curve and are constantly progressing
Wednesday, December 30, 2009
What "not to worry" about
1. Grains: Grains are a reality when you hike up ISO so that you can shoot at smaller apertures and higher shutter speeds. It happens in film and it will happen in sensors but softwares today do provide lot of options to reduce grains at high ISO, but you will lose some sharpness
2. Sharpness: You should only worry about not getting camera shake and not getting focus right. If both these are absent then the sharpness is more a result of the lens you own, the aperture used and where your subject appears in the frame. For good DOF at given apertures read about "hyperfocal distance" on the net. Edges are often less sharp than the center but then if you compose by the thirds then you obviously do not have the subject in the center
3. Lens: Again as long as you are shooting to post photos on the web or printing up to A4 do not worry too much about the lens you own. Most lenses today are pretty decent. If you are going to make money by selling photos you can worry about the lenses you own
4. Color, contrast etc.: Nowadays Photoshop and the likes give you all options to enhance color, contrast, levels, shadows, highlights etc. so invest in photoshop rather than a $1000 lens or lenses
What should you worry about:
1. Composition: This is the "art". If you get a chance take a look at "Raghu Rai's" book on photos of the Taj. They are grainy, not too sharp and could be better in terms of contrast BUT the compositions are flawless. You see angles of the Taj you never imagined. Each photo is a timeless classic. It tells a story
2. Shooting the moment: In your pursuit to get the science right don't miss the right time for the shot. Lot of shots are about capturing the moment. Just shoot the moment
3. Framing: Before shooting take a split second to look through the whole frame and 99% of the time you will find you can avoid or include something and re compose. Most amateurs look only at the subject through the viewfinder and get a lot of distracting elements in the picture
4. Get the Horizon STRAIGHT: For god's sake keep your sense of geometry intact before you shoot. so many good shots look horrible because of a tilted horizon (unless it is intentional and adds value to the picture)
5. Common Sense: Think for a few minutes before you embark on a shooting session on what you will shoot 90% of the time on that day and put on that lens. Pre-set aperture/shutter speed (whichever is relevant), custom functions and ISO so that you spend less or no time in camera adjustments
Subscribe to:
Posts (Atom)